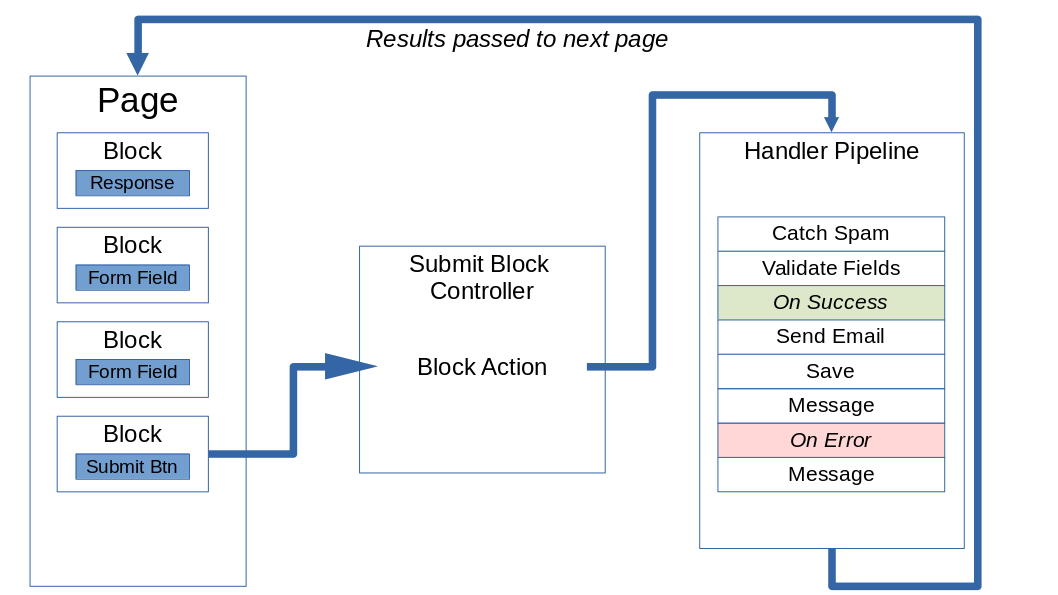
Example Handler Pipeline

Form processing in Form Reform is managed through a fully configurable form handler pipeline. A toolkit of form handlers is assembled into a sequence to provide the handling specific to the purpose of an individual form.

To illustrate the concept, here we look at an example form handler pipeline. This is installed as the default form handler pipeline and you can then edit that default or the just edit the handling for specific forms by shuffling, adding and removing form handlers from our kit of form handlers. You can even create form handler plugins to extend what you can do with the pipeline.

Example form handling pipeline.

This example form handling pipeline is configured when Form Reform is first installed.

This is a good starting point for most forms. A common addition is to add one or more Send Email handler steps to acknowledge the form submission to the visitor and to notify an administrator. But there are many more possibilities. You can re-arrange existing form handler steps, insert more handler steps, or even create your own application specific handler steps.

1. Spam Detect

A form handling pipeline usually begins by eliminating spam. This can be configured to either report through to error processing (On Error), or fail silently.

2. Validate Input Fields

We then validate the inputs. Validation of each input is managed by the respective block controller for that input and the validation results for all inputs are and accumulated by this step.

3. On Success

On a good submission there are no errors to report and processing continues from On Success. When there are errors, processing jumps forward to On Error.

4. Save to Default

We save the submitted form data.

5. Message

Then we prepare a nice response message to thank the visitor for submitting the form. The message is passed back to the page to be shown with a Message block. Form processing will then automatically end because we have reached the end of On Success part of the pipeline.

6. On Error

When there are errors, the On Success test jumps forward to On Error.

7. Message

We use the Message block to format the error messages.

Additional Pages

Reform the way you add new input controls

If you need a specialized template or a custom input element, you can design new templates  or new block types for form elements as you would any block type.

Blocks are easy for third party addition or extension. Block templates and are the first thing any Concrete CMS developer learns to code. They are one of the easiest things to code. The underlying mechanisms are well established and reliable.

Reform what you can do with form data

Form handlers are built about the same extensible plugin system as many of my other addons (Universal Content Puller, Omni Gallery, Extreme Clean ...).

The whole system is aimed at easy extension within Form Reform, by third party addons, by agencies and by site building developers.

Handlers can be easily added to do whatever you want with the form data.

Reform where you can save form data

Saving form data with Form Reform is simply a handler in the processing pipeline. You can save to multiple locations or just one location.

If you need to save data elsewhere, such as to a dedicated table, a table provided through another addon, to another database, send it to an API, forward it to another server, or anywhere you can imagine, you can adapt or develop a form handler to do so.

The complexity of the code depends on where you are saving or sending the data, but wrapping that into a form handler plugin for Form Reform is straight forward.

The Form Reform handler plugin system is designed for easy extension.

Form Reform

Reform the way forms are built. Build a form out of blocks. Take control of how form submissions are processed and how the submitted data is stored. Easy to extend. Easy to reconfigure. Tangible data. Easy to add your own integrations.

Form Reform Display

List and display form submissions from Form Reform.

Form Reform UTM

Not just Form Reform and not just UTM! Capture and hold incoming UTM (or other) tags and make the tag values available to Form Reform and/or Conditional Redirect as {{place_holders}}. You don't need Form Reform to use this.

Form Reform Dynamics

Form handlers for querying Microsoft Dynamics, forwarding and updating form data to Microsoft Dynamics.

Snapshot

A suite of advanced image capture and upload tools. Enhanced drag and drop file uploading. Make screengrabs from within Concrete CMS. Capture images directly from device webcams. Edit images before uploading.

Form Reform Attributes, Express and Users

Save submitted forms to Express objects and user attributes. Add and remove users from groups.

Form Reform Image Picker

Form Reform Image Picker provides an image picking input block for Form Reform. The Image Picker Input is preconfigured to connect to most Omni Gallery gallery and slider display widgets, the core gallery block, and thumbnail showing templates for the core page list block. Advanced settings allow the Image Picker Input to be configured to pick images from other galleries and sliders.

Form Reform Data Picker

Form Reform Data Picker provides data picking input blocks for Form Reform. The Table Picker Input is preconfigured to connect to Universal Content Puller table display widgets. Advanced settings allow the Table Picker Input to be configured to pick data from other HTML tables.

Form Reform Macros

Extends Form Reform with form handler macros. Provides a new dashboard page at System & Settings > Form Reform > Form Reform Macros to manage macros, and form handlers to run macros.

Form Reform Developer

A growing suite of resources to assist those developing blocks, handlers and more complex forms for Form Reform.

Learn with a simple form

While you may have plans to implement some much more complex forms using Form Reform, we strongly recommend you start with a simple form such as our contact form example in order to review the basic principles of using Form Reform before you move onto anything bigger.

  1. Start by submitting the form at Getting Started - Your First Form a few times, even making some deliberate mistakes.
  2. Watch our Getting Started with Form Reform video to see how the form is built.
  3. Read through the rest of Getting Started - Your First Form for more details of how this form is built.
  4. Create a test page on your site to build your own version of Getting Started - Your First Form and experiment.
  5. Develop your test page with some of the concepts introduced by our further examples and experiment with some of the other form inputs.