Plugin System
Many of my more advanced packages use a sophisticated plugin mechanism for easy expansion, both within the package and across packages. If you are already a user of my packages, you may already have met this documentation system in the 'plugins' dashboard pages such packages provide.
Built in Documentation
The plugin system includes built in documentation. If you have used any of these addons, you will have seen the user documentation in the associated plugin select dialogs and in the dashboard plugin list pages.
The same documentation is displayed on this site here using Package Magic. While Package Magic is primarily a dashboard tool, it also provides a block that can be used to create documentation pages for any use of my plugin systems on the front end of a site.
That block is used on this site to provide the latest documentation for Package Magic and other addons.
Settings Export and Import
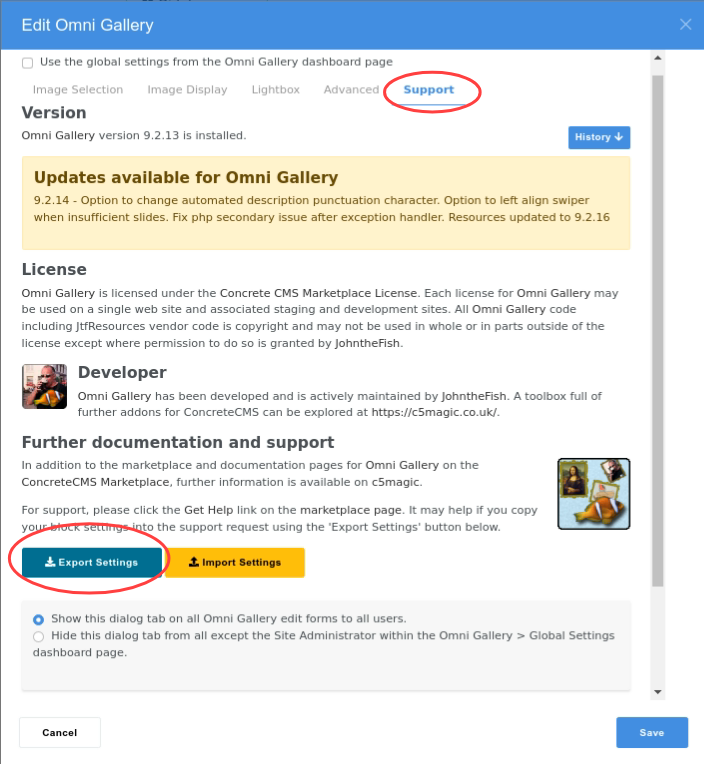
Where supported, the Export and Import settings buttons can be found in the Support tab of the block edit dialog.
A related option is a View settings button that can be shown in the front end view of a block to enable site visitors to view and copy settings. Where supported, this is typically enabled from amongst a block's developer settings.
Easy Setup
- On this site find an example similar to what you require, click the View settings button, copy the settings JSON.
- On your page, add a block. On the Support tab click the button to Import settings, paste the settings JSON and import,
- Edit the settings to what you require.
As well as simply copying and pasting the JSON as text, the settings can also be downloaded to and uploaded from files, or stored with a name in the Concrete database. When stored in the database, the name must be at least 5 characters long.
Block Default Settings
Rather than be stuck with the default settings as a strating point when adding a block, blocks that use the plugin system will have a dashboard edit dialog for editing default settings. This will look generally like the block edit dialog, but in a dashboard page, typically in amongst the Stacks & Blocks dashboard section and will be named somethimng like Global Settings.
After editing and saving the defaults, from now on whenever you add a block to a page the initial settings of the block add dialog will be the new defaults you have saved. A big time saver if you have many blocks to add with similar settings.
A further opion in the block edit dialog is a simple checkbox to use the global settings. When checked and saved, the block continue to use whatever the global settings are. This provides an easy way to centrally manage the settings across many blocks. For example, if you add the Reviews blocks to a page, you can manage them all centrally through the global settings.
Plugin Permissions
At a basic level, any plugin can be enabled or disabled in the associated dashboard listing page. Such enable/disable is only available to the site admin user and simply makes a plugin unavailable throughout the site.
Where a site has multiple administrators or editors, sometimes a more sophisticated access to plugins is required. For example, with Universal Content Puller, perhaps you need to use a URL or Any Database source on a few pages, but you don't want any old site editor to have that capability. At the same time, you would like your editors to be able to pull areas between pages.
The plugin system includes an option to apply permissions to individual plugins. When plugin permissions are enabled, the dashboard management pages for plugins show buttons for the site admin user to allow or deny permission for users or groups to use any individual plugin in a dialog with the familar concrete5 permissions dialogs.
Plugin permissions can also be enabled directly in config data at application/config/generated_overrides/jtf_resources.php with the key 'plugin_permissions_enable' => 1. For some addons, the application of permissions can also be controlled by a checkbox at the bottom of the Support tab of the edit dialog.
Plugin permissions are enabled globally, not just for individual packages. Enable plugin permissions in any one addon and you will have plugin permissions in all supporting addons installed on your site.
Unlike concrete5's advanced permissions, this is not a one-way decision. If you want to experiment or decide you no longer need to use plugin permissions, simply clear the setting and plugin permissions will be ignored.
Custom Plugins
The plugin system is open to all developers for extension of my addons. Any developer is welcome to provide plugins for my addons within their own packages or create application specific plugins where my addons are used on their customer sites.
Plugins are created simply by placing a compatible class in a specific directory of your own package or /application/ space, following the same directory structure as the package that provides that plugin type. The new plugin class needs to inherit from the base class for that plugin type or another plugin of that type. Details are provided by comments in the code for the base class and existing plugins.
For example, in Universal Content Puller, new Content Source plugins should inherit from ContentSourcePluginBase and should be located at either:
- packages/yourPackageName/src/JtF/UCP/ContentSources/Plugins/PluginName
- application/src/JtF/UCP/ContentSources/Plugins/PluginName.
Content sources should be in the namespace JtF\UCP\ContentSources\Plugins. In fact, if you configure the plugin type's namespace in your package autoload registries, the plugin can be located in any mapped directory, but its best to stick to the conventions.
Other types of plugin across all packages that use my plugin mechanism follow a similar pattern.
Plugins will be automatically 'discovered' by the plugin system by visiting the associated dashboard page. If you want to be more sophisticated, discovery can be initiated during package installation or upgrade by calling the listAll(true) method on the respective manager/controller for the plugin type. You can see examples of that in my package controller classes.
Problem solving
Cache path exceeds...
A windows system can throw an exception about cache path length. The full message will be something like "Cache path exceeds Windows PHP MAX_LENGTH of 260 characters" and the name of the exception is WindowsPathMaxLengthException.
This arises as a combination of ConcreteCMS and php internal issues. From JtFResources v2.19.32 we have a work-round for this by introducing the configuration value max_key_length in the file application/config/generated_overrides/jtf_resources.php. On windows, this will be automatically set to a value suitable for most windows installations.
If you experience the above exception:
- Check the version of JtFResources is v2.19.32. If not, update this addon.
- Check the value of max_key_length. It may not be configured for your installation if it has been copied from another site.
- Reduce the value of max_key_length until you cease experiencing the WindowsPathMaxLengthException.
In general, keep the value of max_key_length as high as practical for your installation. The ConcreteCMS core applies a hashing algorithm to all cache keys and a longer value for max_key_length reduces the (already extremely small) probability of cache key collisions.