FAQ & Problem Solving
Answers to questions and solving problems with Form Reform.
Do I have to enter the form name for every block?
You can use the default form name (form_reform) for one form on a page, and hence for all blocks in that form. If you have more than one form on a page, you need a different form name for each form on a page. Only one of them can be called form_reform.
When the form is saved, the form handler can configure an alias for the form name. This is the name it is saved under.
For example, you could have the in-page form using the default name form_reform, yet save the form as "contact".
Can I have more than one form on a page?
You can build as many forms as you like on a page. Each form needs to have a unique From Name, so you need to plan your form names and make sure you enter the correct form name for each Form Reform block in each form.
Can a form have more than one Submit button?
Forms can have as many Submit buttons as you like. Supporting multiple Submit buttons is an essential part of building multi-step forms.
Each Submit button has its own name, label, form handler pipeline, form state behaviour and options for things like AJAX submission.
Whilst the obvious need for multiple Submit buttons is on a multi-step form, you don't have to limit your use of extra Submit buttons to that. You can use different Submit buttons anywhere you would like to present your visitors with an option on how the form is processed. Extra Submit buttons is another alternative way of implementing some kinds of Conditional Processing.
On a multi-step form, a Back button is also a use for a Submit button. In this case the handler pipeline of the back button sets the form state back to a previous state.
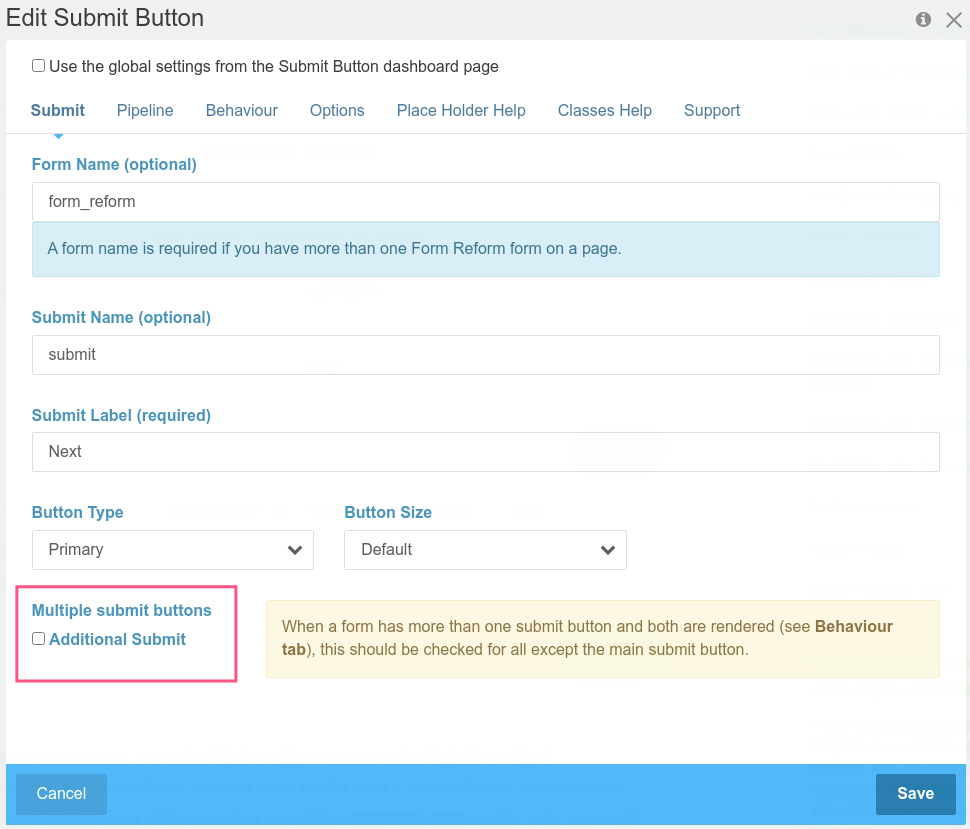
In the Submit button block edit dialogue, at the bottom of the Submit tab, there is a checkbox for Additional Submit. When more than one submit button could be rendered at the same time, this should be checked on all but the primary/final Submit button on a multi-step form.
Can a form have repeatable elements?
Form Reform provides an incredibly flexible system for Repeatable Groups of inputs. Like anything else in a Form Reform form, a repeatable group of inputs is created by adding a Repeatable Group block to a page.
Repeatable groups work by identifying a region of the page as a repeatable group and adding a Repeatable Group block to that region. Behind the scenes, the repeatable group is a DOM element containing the form blocks to be repeated. From a Concrete CMS point of view, this could be a container, layout, stack or any other grouping of input blocks.
When you save and publish the page, visitors can now add a repetition of the group of form controls by clicking the Add button in the Repeatable Group toolbar. Groups added can also be deleted and optionally sorted.
Most form input blocks including Snapshot Upload and Webcam blocks can be used in a Repeatable Group. Some blocks are necessarily unique and cannot be repeated in a group, such as a the Submit block, Message Display block, Captcha and CCM Token blocks. For details, check the list of Form Reform blocks.
This is not limited to form inputs. You can include other blocks in a repeatable group such as content and images.
What data gets saved?
Form Save handlers only save data in the {{form}} category at the point the save handler executes.
A Message handler with {{form:all_formatted}} will provide a JSON dump of the data at the time the handler executes.
Depending on the Save handler, a small amount of metadata will also be saved with the form such as user identity, ip address, session identity and date/time. One use of such metadata is for correlating form population and update submissions.
Data in any other {{category}} will not be saved!
For example, when working with a repeatable group of inputs, the raw inputs will be saved because they are already in the {{form}} category with identities such as {{form:group_name.0.my_input_name}} and {{form:group_name.1.my_input_name}} etc.
However, aggregated data such as as the list of all my_input_name - {{all_group:group_name.my_input_name}} will not be saved. You can use such symbols in a message and see the list of aggregated repetitions, but it will not be saved!
If you want to actually save such data, or any other data not in the {{form}} category, you need to put it into the {{form}} category using one of the Extend Form Data handlers to insert one or more new values into the {{form}} category.
What sequence are form fields saved in?
For most save handlers, the order submitted form fields are saved in does not matter. When the saved data is only ever used by Form Reform or other applications reading it using php code on the web server, the application can do whatever it likes to sort form the retrieved form fields or pluck individual fields from the save submission.
However, when a form submission is saved to a file that may read directly by users or viewed in a spreadsheet, perhaps the exact sequence form fields are saved in is more relevant.
With that in mind, the form handler Sort Form Data can be used to sort the submitted form input fields to a to configured sequence. The sorted sequence will then be respected by any following use of the data, including save handlers and in messages.
Columns in a CSV file
When saving to a CSV file, the order of columns can be refined further. When the Save to CSV handler creates a CSV file from the first submission of a form, the column names are set from the submitted form data. After that the Save to CSV handler looks at existing column names and maps the submitted form data into the matching columns. Non-matching form fields are discarded.
With that in mind, sites can dictate the sequence of columns by opening the CSV in a spreadsheet such as Excel, shuffling the columns, then replacing the CSV on the web server with the modified CSV. Any subsequent form submissions saved to the CSV will add data to the respective columns.
A similar approach can be used to add new fields to a form and hence columns to the CSV it is saved to, or to remove columns from the CSV. The CSV can be manually edited to insert the new columns with names matching the form field handles, or to remove unwanted columns. Subsequent submissions of the form will map the submitted form data into the matching columns and discard any non-matching columns.
Can form processing direct a visitor to another page?
As with many form processing options, Form Reform has a handler for that! You can add a redirect handler to the processing pipeline and choose location to redirect to.
For a regular form submission, the Form Reform makes a 302 or 301 redirect immediately after the pipeline has completed. If messages are configured, you can place a message block on the redirect target page. You can even place further form input blocks and another submit on the target page for a multi-page multi-step form!
For an AJAX submission, messages are shown on the submitting page and the redirect is then made after a configurable time delay.
How do I hide other blocks for form states?
One of the great things about Form Reform is that you can mix other blocks in with Form Reform blocks.
Form Reform manages what blocks are visible in various form states with the Behaviour tab of each Form Reform block.
Behind the scenes, Form Reform blocks are hidden with a class such as jl_form_reform__form_reform_hide_when_success. These classes can be used with any block on the page, to hide the block in various form states. See Using other blocks in forms.
If you are ever wondering what state classes are available for the current form, in Edit Mode have a look at the Submit Block and the Classes Help tab. You can copy/paste classes from the list provided.
Form states classes are not behaving
What we mean here is that a form block with boxes checked in the Behaviour tab or other block with a form state class such as jl_form_reform__form_reform_hide_when_success or jl_form_reform__form_reform_hide_when_2 is not being hidden or disabled as you expected.
Behind the scenes these classes interact with a form state class which Form Reform attaches to the .ccm-page element which Concrete CMS wraps round every front end page. Form Reform adds CSS to the header so that the respective hide when and disable when classes are hidden and/or disabled when the .ccm-page element has the associated state class.
There a few reasons why these classes may not be behaving as expected:
- Your handler pipeline has not set a new state, either directly with Next Form State handler or with a Message handler.
- Your theme header is missing something required by Concrete CMS, such as getPageWrapperClass() and prevents Form Reform from injecting the state class.
- A typo in the class you have added directly to a block.
- Using a class name intended for a different form name to the form being submitted. The default form name is form_reform and this can be used with an alias in the save handler for most forms. Where you actually have a form with a different name and use that name in the form blocks, then the form state classes will need to use that name.
See Using other blocks in forms.
With Form Reform Developer, we have some additional tools to help
- The Form Analysis tool includes a live analysis of how blocks are affected by form states.
- The Form State Hacker block can be temporarily added to a page to conveniently modify form states and help visualise how blocks and states are interacting.
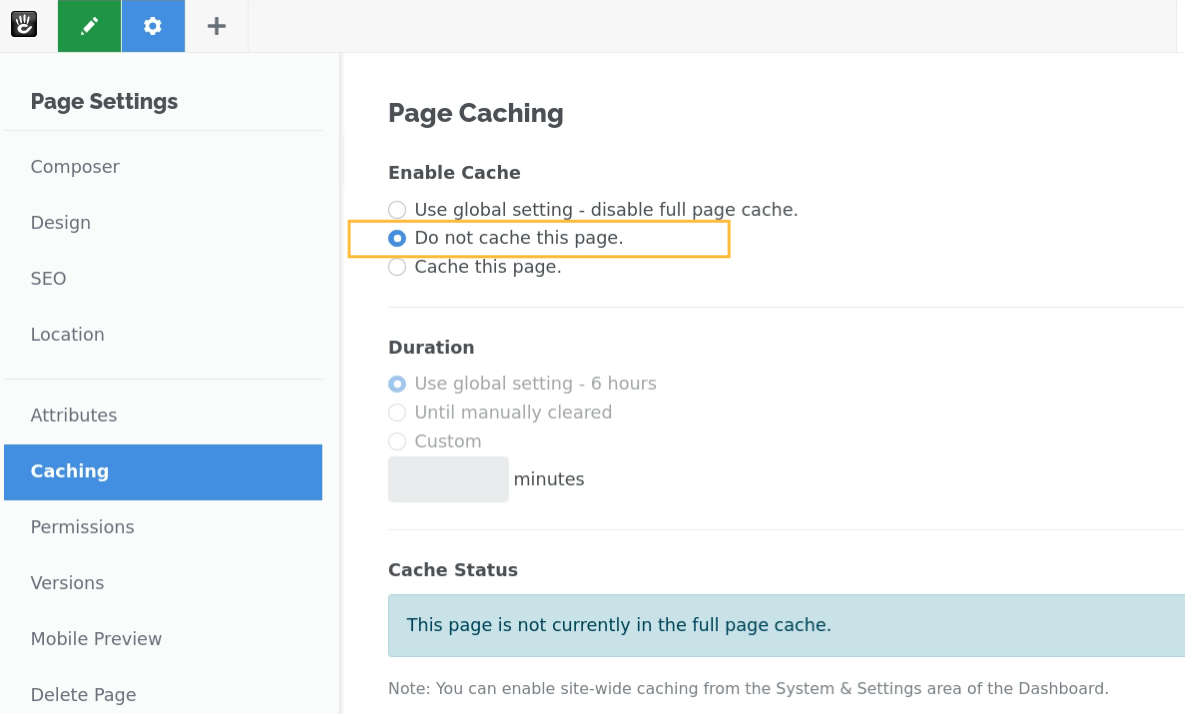
How does the Page Cache affect Form Reform?
For a single step form that redirects to another page when submitted and no in-page error message other than the browser supplied field validation, you don't need to be concerned with the page cache. Everyone views the page in the same state.
As soon as a page can exist in multiple states, such as the form, with an error message, with a success message, then caching could preserve the wrong state of a form and prevent visitors from seeing the state applicable to their progress in a form.
Form Reform blocks all have block cache settings that should prevent the page from being cached.
Nevertheless, sometimes you may need to explicitly disable (or even explicitly enable) the page cache for pages containing Form Reform forms.
What is the correct order for "On Error" and "On Success"?
In Error Handling there is no correct order for On Error and On Success, it is entirely up to you, your form, and how you like to think about the processing.
After validation you could configure a pipeline with On Error and a Message followed by On Success and then the rest of your pipeline.
Or you could configure validation followed by On Success then leave On Error and its associated Message to the end of the pipeline.
Can I have multiple "On Success" or "On Error" checks?
You can have as many On Success or On Error handlers as you like. Whichever you use first, Error Handling can jump forward to the next instance of the complementary On Error or On Success handler in the pipeline. They don't even need to be configured in matched pairs, as long as you have at least one of each.
Configuring On Success first can be useful when you have multiple steps that could generate errors. For example, when you send an email, perhaps the email handler will return an error for a faulty address. In the pipeline below we have two On Success (ie, no errors yet) checks, but they share one On Error at the end.
- Spam Detect
- Validate Input Fields
- On Success
- Send Email
- On Success
- Save to Default
- Message
- On Error
- Message
How do I show a confirmation screen?
A form followed by a confirmation screen is really a two-step (or more) form. The first step provides the form inputs and a Submit button. The second step shows the data form the form inputs and a Confirm (the final submit) button.
There are many variations of how you can implement this in detail. Here is just one of the possibilities.
Step 1.
Provides form input blocks. (In step 2 and when a Success message is shown these inputs are either not rendered or hidden + disabled.)
The Submit button:
- Validates all inputs.
- On success:
- Saves the form to the visitor's session.
- Formats a confirmation message with form data from the input blocks (the form will need a message block to display this)
- Set the next form state to step 2.
(In step 2 the step 1 submit button is either not rendered or hidden + disabled)
Step 2.
Shows the message formatted by step 1 and provides two submit buttons, one to confirm and one to edit. (In step 1 and when the Success message is shown these inputs are either not rendered or hidden + disabled.)
The Edit Submit button:
- Set the next form state to step 1. This will take the visitor back to step 1 to edit their form data.
The Confirm Submit button:
- Retrieves form data from the visitor's session
- Sends any email confirmations
- Saves the form data to the default store
- Formats a success message - the next form stare will be Success.
Some key points
We use the session to keep form data between steps. We could have done this with hidden form controls, but that would be less secure and require further validation after confirmation in step 2.
The form inputs in step 1 should be provided with an Initial Value from (as a minimum) the visitor's session. This is necessary to provide continuity after the Edit (submit) button from step 2.
If the form submission is AJAX, then all form controls need to be rendered in all steps/states. Those not required in a state should be hidden and disabled.
If the form submission is not AJAX, then form controls can be configured to not render in the states where they are not required.
The above is not a complete description. We have emphasized the key parts of such a form and omitted many minor details that are described in these documentation pages.
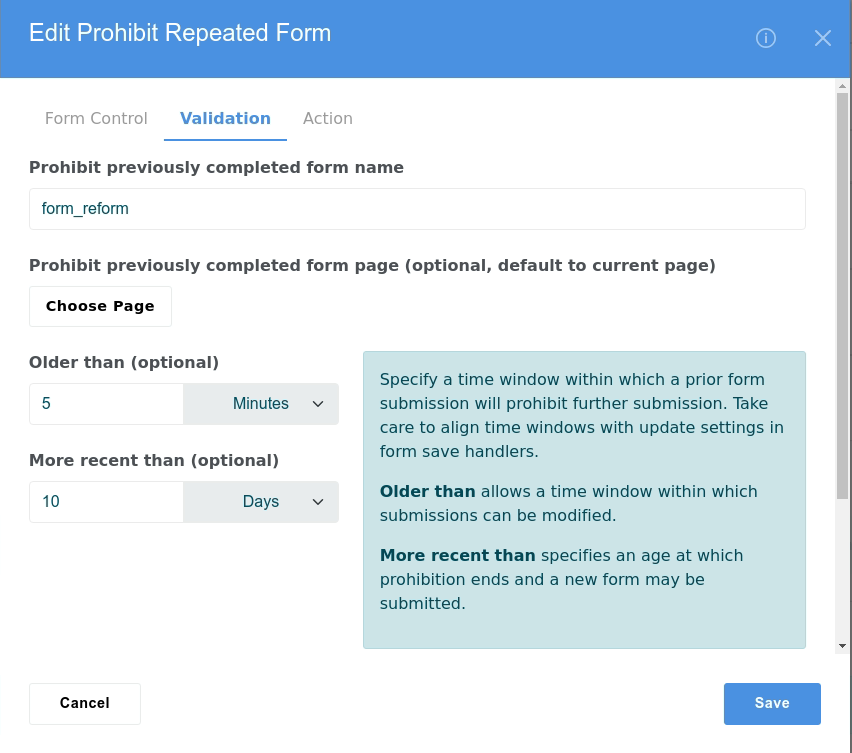
How do I prevent a visitor from submitting a form twice?
To prevent a user from submitting a form more than once, we have a dedicated validation block Prohibit Repeated Form. When added to a form this can:
- Prevent a form from being resubmitted.
- Prevent a form from being submitted if another form has already been submitted.
- Redirect to another page if a form has already been submitted.
- Show a message if a form has already been submitted.
- Allow a form to be resubmitted before a time window begins, so allowing a visitor a brief time to correct a mistake.
This block works by looking for the form in saved submissions, so the previous submission must have first been saved using one or more of the save handlers such as Save to Session, Save to Cooke or Save to Default.
What do I use a "Condition If" handler for?
Lets start by what you shouldn't use a Condition If ... Condition End handler sequence for. It should not be used for error handling. We have On Success ... On Error for general error processing.
Form input blocks all support general validation, but perhaps you require more complex validation for a specific input or for a combination of inputs. Here you could use a Condition If ... Condition End to check for the complex validation and use a Set Error handler to register an error if the Condition If fails (or passes).
Then after the Condition End the new error can be managed with On Success ... On Error handlers.
Another application could be directing forms to different processing depending on form content. For example, sending an email to a different sales team member depending on a potential client's answers to a form.
A practical example on this site is the demonstration of UTM handling.
Having said all that, if the chain of handlers is really long, it may be more convenient to manage with a custom form input or a custom handler that embodies the decision process for you, Condition If ... Condition End is not intended for complex processing flow.
Can I have multiple "Condition If" handlers?
You can have as many Condition If ... Condition End sequences as you like. But you cannot nest them. If you try and nest them you will just create premature end to the outer Condition If and the remaining handlers will be meaningless and their behaviour undefined.
However, as a Condition If sequence may include multiple Condition ElseIf and each of those can have up to 5 comparisons with AND or OR logic, you should be able to configure some quite complex conditional logic by thinking carefully about how you arrange your boolean algebra.
Condition If - How do multiple conditions work?
Form Reform facilitates conditional handling of forms with ConditionIf / ConditionElseIf / ConditionElse / ConditionEnd handlers. For example, you could implement different processing depending on the rating a visitor enters into a form.
Within any condition, you can have multiple sub-expressions chained together with AND or OR.
At the bottom of any condition is a radio set to do one of end the conditions, AND or OR.
At the end of the first condition, all options are available. Selecting AND or OR will show another condition, where further conditions are limited to the previously selected AND or OR.
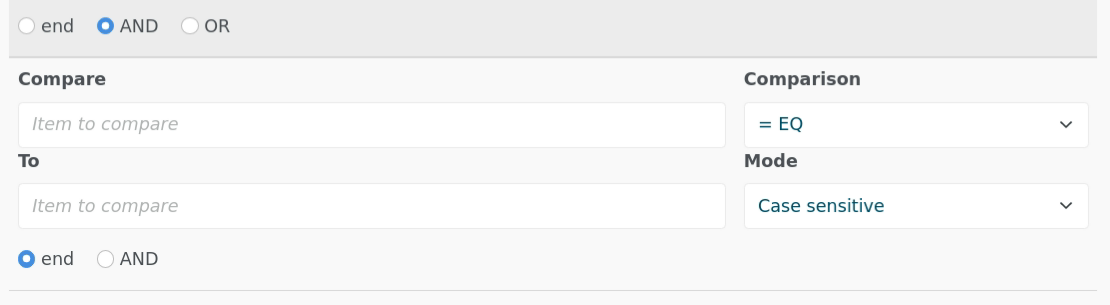
You can have up to 5 conditions combined in this way, all AND or all OR.
If you need more than 5 conditions in any Form Reform condition, this number of conditions can be configured in application/config/ at jl_form_reform.condition_if.max_conditions.
(This is the same condition engine as used in Conditional Redirect attribute)
Can I put Form Reform blocks in stacks?
You can put Form Reform blocks into a stack, layout or container. You can even pull part or all of a Form Reform form from a stack or from another page using Universal Content Puller.
If you desire, you can build a toolkit of common form components using stacks and/or UCP and then build your finished forms from that kit of common components.
For example, if you have a common group of first/last name and email form inputs, you could put them in a stack and use that stack across many forms.
For forms you use in multiple places, you can put an entire Form Reform form into a stack including the Message block for a response and the Submit block with associated form handler pipeline. If you need to track where a form in a stack was submitted from, form stores include the submitting page anyway, but if you would like to see the page name in the actual form data include an Extend Form Data handler to add {{page:name}} to the form data.
Email not sending
If you have configured a form to Send Email, but the email is not sending, here are a few tips and checks.
- Your site needs to be connected to an External SMTP Server. If you are connecting to a GMail account, my friend Nour has posted a detailed guide for connecting a site to GMail.
- Some SMTP servers will only accept email from a specific from address or domain. Make sure the From address in the handler pipeline matches the from addresses the email server accepts.
- Email address validation can be over-zealous. Consider un-checking Strict Validation and Test MX record.
What is the difference between the handlers Save to User and Save to User Textarea Attribute?
We have two handlers for saving to user attributes. Both require a logged in user, so these handlers should not be used for forms a visitor/guest can submit.
Save to User Textarea Attribute
Is the simpler concept. This is very similar to Save to Session and Save to Cookie, except it saves the entire submission as serialized JSON into the configured textarea attribute. We recommend you should configure a different textarea attribute for each form if you use this form handler.
Save to User
Is similar to Save to Express. This handler presents a table of user attributes and you can then map form values into each of the user attributes.
If you don't want an attribute to be modified by the Save to User form handler, leave the corresponding row empty and check to Ignore Empty. Take care here, or you could end up accidentally clearing the wrong attributes after form submission!
What kinds of custom form handlers can be added?
The kind of form handlers you can add is really up to your requirements and imagination. Some custom handlers we have implemented include:
- Forwarding completed form data to a SOAP API.
- Forwarding completed form data to a REST API.
- Create, Read and Update integration with Microsoft Dynamics.
- Using zip codes to lookup an area sales office from a database table.
- Saving completed form data to a custom database table.
- Retrieving customer account details from a third party system.
See Developing new form handlers for more details.
What is happening when my form is submitted?
To help you understand what is happening and diagnose any issues when a form is submitted, Form Reform provides extensive built in logging and diagnostics.
Built into the handling for Submit blocks are diagnostic logging and debug options. You can find these settings under Options in the Submit block edit dialogue.
The logging and debug options are similar. The first level outputs form handlers as they execute. The second level outputs the configured pipeline followed by form handlers as they execute.
With the debug output, the first two levels are prepended to messages, so will only be shown if there is a message block visible on the page. Debug also has a third level, where the data is output immediately with no consideration for location on the page.
For an AJAX submission, debug is also copied to the browser developer console.
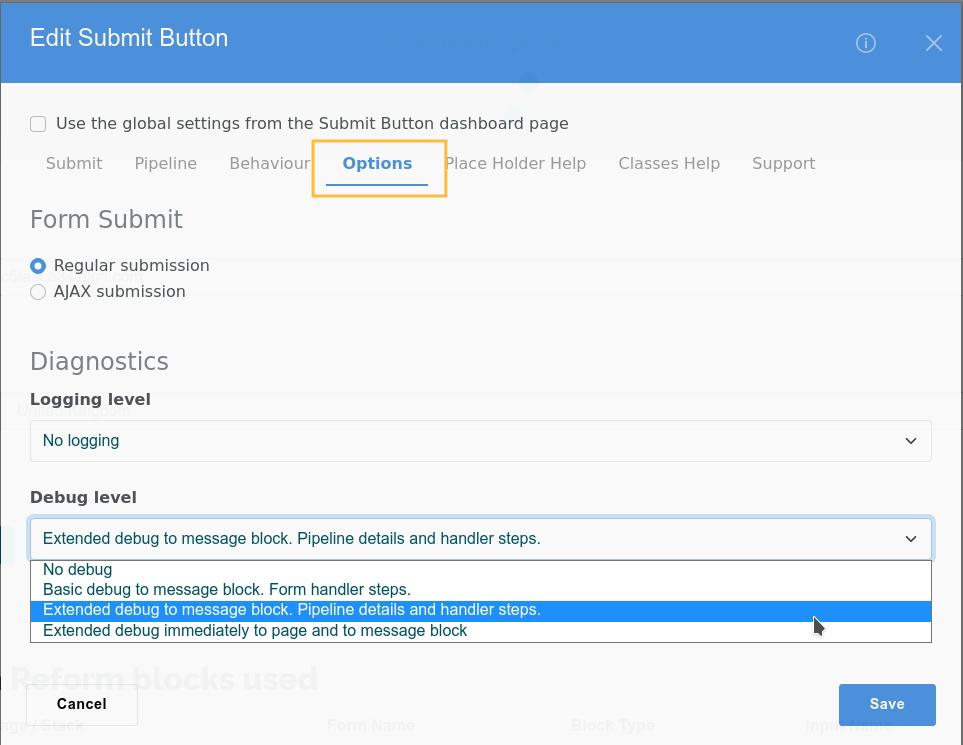
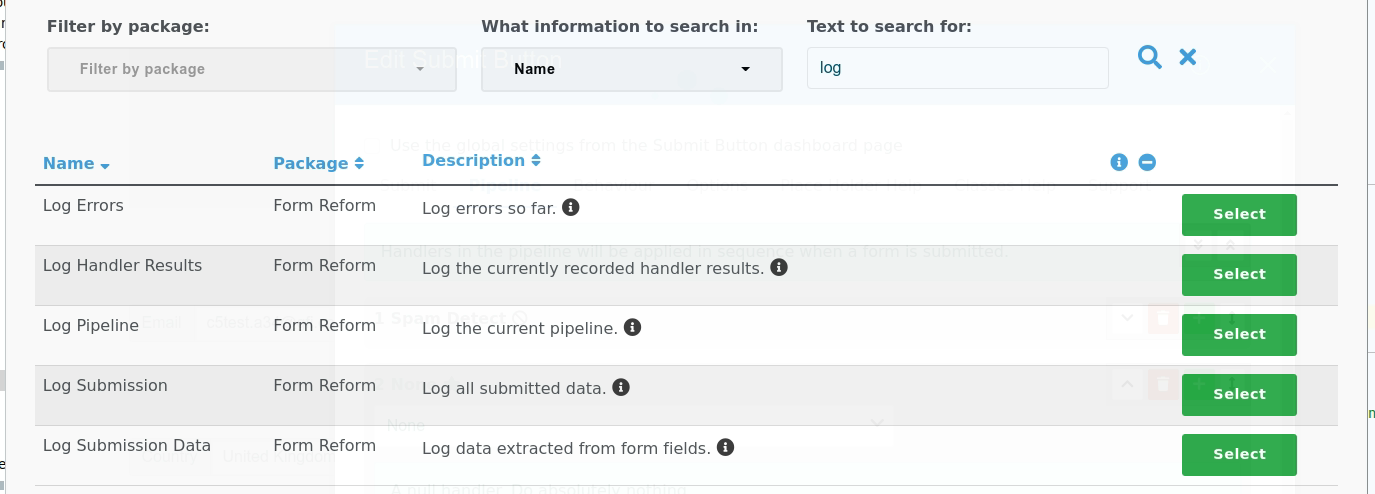
In addition to the logging and debug diagnostic settings built into the Submit block pipeline, Form Reform also provides some specific form handlers that will dump data to the Concrete CMS log. There is some overlap with the above logging settings. These can be inserted into the pipeline as you would any other handler.
Form Reform Developer
When you need more information about your forms, Form Reform Developer provides an analysis of all forms, the controls used and pipeline processing.
When developing new form handlers, form input blocks and generally more complex forms, a look further inside the form handler pipeline data can be helpful. Form Reform Developer also provides handlers to dump pipeline data and other form data into messages and the log.
Additional dashboard pages allow you to quickly explore form controls and handlers, to find all site pages containing forms and analyze the forms.
How do I display form results?
To display form results, we have the free extension Form Reform Display. This provides blocks to display individual form submissions or lists of form submissions with templates for table and definition list format.
If you need an application specific display, Form Reform provides its own item list class JtF\FormReform\Reports\FormReformDefaultList. Ease of cooking your own display is one of the big advantages of Form Reform . Each form submission is held as single row in the database table, so can be retrieved with a trivial query.
In the dashboard Form Reform Display provides a sophisticated report generator, where form results can be filtered, displayed and output as CSV.
Are UTM tags being recorded for guests?
This is a tricky point. During development of Form Reform UTM we discovered that some Concrete CMS installations were not saving guest session data recorded using the core session object when saved from the controller on_start() method. It worked on some servers. It didn't on others. We have no idea why.
The session store handler used by Form Reform was saving reliably, but not the similar code for Form Reform UTM in an on_start for guests. It always behaved as it should for logged in users.
Hence Form Reform UTM provides a choice of 3 recording mechanisms.
- php $_SESSION (default)
- The Concrete $session object (check this works reliably for your server and guests)
- A cookie using the Concrete $cookie object.
Recording in a session only lasts as long as the session. Recording in a cookie can be configured for any cookie lifetime.
Geolocation
As of 1 September 2025 the core geolocation service has run into issues where the API used is no longer free and returns a 403 error. I anticipate an alternative will be identified and incorporated into a core update at 9.4.4 or 9.4.5.
However, in the mean time sites using my addons may need a viable workround. With that in mind, Form Reform, Universal Content Puller, and Conditional Redirect can now fallback directly on alternate geolocation services should the core geolocation fail.
This fallback defaults to ipquery.io and then geoip.fortnic.com.
To revise the list of fallback geolocation APIs considered, list the API JSON url in config data as identified in /vendor/JtFResources/Utilities/BrowserLocator.php or jl_conditional_redirect/src/JtF/ConditionalRedirect/ConditionalRedirectLocator.php. For sites that are compatible with their terms of use or subscribe to a license, the fallback code is also compatible with ipwho.is and ip-api.com.
Handling a 403 error within the core geolocation can be time-expensive for some web servers. If your server is affected we have a config file option. Setting jtf_resources.skip_core_geo_service to true will skip core geolocation and go straight to the fallback. Remember that once the core geolocation is back in action, you should remove this flag.
What is the Documentation block?
Form Reform includes a Documentation block you can use to show various aspects of Form Reform. This is the same documentation block used for many of the documentation pages used on this site. In the block add panel, you can find it in the Developer block type set.
Whilst you can always refer back to c5magic.co.uk for the latest Form Reform documentation, sometimes you may find it useful to have a local copy. Just create a page on your site, perhaps in a branch of the site tree private to your editors, add the Documentation block, and pick a template for the information you want.
At the time of writing this includes:
- Blocks - all the installed blocks in the Form Reform set.
- Blocks Used - the blocks used on a specific page, such as at the bottom of Getting Started.
- Classes Help - classes that will be of use when adding other blocks among forms, see the bottom of Form Behaviour.
- Example Pipeline - an example form handler pipeline.
- Place Holder Help - the {{place holders}} available. There may be further {{place_holders}} provided by specific form handlers.
- The Kitchen Sink - a sample of most form control blocks and templates, as described above.
- Submit Pipeline - a read-only version of the pipeline edit dialogue for the Form Reform Submit button.
Feel free to create your own templates for further documentation and even ship them with marketplace packages that integrate with Form Reform.
What do the form controls look like in my site theme?
We can't show you in advance, but once installed Form Reform includes a Documentation block you can use to show various aspects of Form Reform. This is the same documentation block used form many of the documentation pages used on this site.
Just add the Documentation block to a page and select The Kitchen Sink block template. The Kitchen Sink is an output of all Form Reform blocks and templates. This can't show absolutely everything, but it comes very close and should show enough for you to get a good idea of what each form block and template will look like with your site's theme.
Form Reform is developed and tested under the core Atomik and Elemental themes, so will adapt readily to other Bootstrap based themes
Proxy server, proxy cache and load balancer interference
Any 'service' that sits between your site and the users or visitors browser can interfere with things like IP addresses and continuity of the visitor or user's session. This can manifest as dropped login and discontinuity between pages. This is a general web issue and not specific to Concrete CMS.
If you experience such issues, check the latest Concrete CMS documentation and forums for advice on configuring Concrete CMS and the services.
Specific to Form Reform, such issues could manifest as any AJAX request becoming disconnected from what a user or visitor is doing. For example, if you use Snapshot for file uploading or Form Reform Image Picker to pick images, these could become detached from the actual form submission.
The solution is to exempt Form Reform routing from the intermediary service. How you do that is specific to the service, so ask your hosting support. The routes you need to exempt:
- begin with "/jl_form_reform/"
The rest of the route depends on your site and the action. If you want to be specific rather than wild-carding the above, you can check your browser developer console network tab or see how these routes are built in the class JtF\FormReform\FormHandlers\SubmitAction
Where Snapshot is also used, the routes to exempt:
- begin with "/jtf/"
- end with "/upload_manager/"
These routes are built in the class Snapshot\Bases\SnapshotBaseController.
Panic Mode
If something in form handling or a form input block badly breaks things, we have a panic mode flag that can be set in /application/config at the key jl_form_reform.panic.
The effects of panic mode are:
- Any Form Reform block with an edit mode placeholder will show the placeholder.
- The form submit pipeline will not evaluate any form handlers.
- The Send Email handler will not send any email and will not attempt to test MX records.
For those developing blocks, templates and custom handlers, the panic mode flag can be checked in form reform blocks and handlers by calling the static method self::checkPanic().
Install or Update timeout
Form Reform is a very big addon with many blocks and database tables. As a consequence, just as with some big theme packages, on a slow server the dashboard install or update could threaten PHP execution limits.
To mitigate the install overhead, the dashboard Add Functionality installer and update for Form Reform implements a lazy install and lazy update of blocks. The Form Reform package is installed without blocks, then all blocks are installed in the background over the next few minutes.
A consequence is that blocks and updates will not be immediately available after installing or updating Form Reform. The install or update will take a few minutes to complete and you can check the status in the Form Reform dashboard pages beneath Dashboard > System & Settings > Form Reform. The Form Reform Blocks dashboard page also provides a button to force a lazy update of all Form Reform blocks.
If you prefer the certainty of a single action Install or Update, the command line install and update do it all in one request.
- $ concrete/bin/concrete5 c5:package-install jl_form_reform
- $ concrete/bin/concrete5 c5:package-update jl_form_reform
- $ concrete/bin/concrete5 c5:package-update -f jl_form_reform (to force the update, useful if repeating a failed update)
In all cases, the working directory for the command line is the site root directory. If you want to test you are in the right place, you can use an output only command such as:
- $ concrete/bin/concrete5 c5:info
Uninstall
Uninstall of Form Reform cannot take advantage of the lazy process. If uninstall times out, you can usually refresh/repeat until it is complete. You can also uninstall from the command line with:
- $ concrete/bin/concrete5 c5:package-uninstall jl_form_reform
Whoops on install
What we mean here is an internal code exception in an addon or the core when you click the install button from the Add Functionality dashboard page or when you visit a page after installing an addon package.
If you experience such an issue, here are a few things you can check that may resolve the problem.
- Php Version. Check your php version is compatible with the addon, For example, check if you are running php5.6 when an addon requires php7+. You can find the php version in the report at /dashboard/system/environment/info. As a general guide, if your site is ConcreteCMS version 8+ then aim to run on at least php7.2. (It will run on lower versions, but less efficiently)
- Database Entities. ConcreteCMS uses a database abstraction layer called Doctrine. Doctrine works by creating proxy classes that map between php data and the database and sometimes these get out of step or muddled into a chicken and egg dilemma. The dashboard page at /dashboard/system/environment/entities has a switch to control when the proxy classes are regenerated. Try placing this into Development mode when installing an addon package (but remember to disable development mode to speed up a live site)
- File Ownership. The web server 'user' needs to have ownership, or at least full permissions, to access the package files and directory. If it does not, either the package will not install, may partially install, or may install but leave debris behind which interferes with subsequent operation. Such permissions related problems are more frequently encountered on manual installation of packages, typically where the SSH or FTP user uploading the package is not the web server user.
- Cache. ConcreteCMS makes extensive use of a number of different caching mechanisms to speed up web pages. When installing a package, sometimes outdated cached data causes issues with the install. Try disabling all the caches at /dashboard/system/optimization/cache when installing an addon package (but remember to re-enable the caches for a live site).
- Theme. Most marketplace themes are well behaved. Nevertheless, sometimes a theme can interfere with an addon package, so try switching the site theme back to Atomik using /dashboard/pages/themes. You won't loose any content on the front of your site, but some page areas may not be shown until you swap back to your theme.
- Middleware. Some addons implement middleware layers that manipulate pages before and/or after the main rendering of each page. If such addons are installed, there is a possibly they could interfere with the dashboard and other addon installation. Most such middleware implementations include condition checks to ensure they don't mess with the dashboard, but perhaps you can switch them temporarily off just to be sure.
If you experience a code error on or immediately after install and need assistance, please use the Send Message link from the addon marketplace page to report the problem. Assuming you have full error reporting enabled, on the error report,
- Prior to v9.4.0: click the [copy] button immediately below the error message.
- v9.4.0 and later: click the [Stack Trace] button and copy the content.
That will provide a stack trace you can paste into the help request and save time having to request that report later. There may also be details of an error in your site log at Dashboard > Reports > Logs.
Manually Installing or Updating an Addon or Theme
Perhaps you are unable to connect your site directly to the ConcreteCMS marketplace to install an addon or theme. This manual install or update process works for all addons and themes - not just mine.
- In your concrete account, find the addon/theme in your Account > Licenses and download. Make sure to scroll down to the most recent version before downloading.
- You will not be able to download if the license is assigned to your site. If the license is already assigned, first clear the site assignment and you should then be able to download.
- Copy the zip to your site /packages/ directory and unzip (not /concrete/packages !!!). This is usually easiest using your host cPanel file manager.
- In your site, visit the Dashboard > Extend page and the theme package will be ready to install or update
The process is exactly the same for addons and themes, except themes have an extra step of activating the theme after installing.
Sometimes the last step can run out of PHP execution time. This is most likely when installing an addon or theme that installs a large amount of sample content. You should not run into such an issue with any of my addons or themes.
If you do run into such issues, you can run the install manually from the shell command line.
$ concrete/bin/concrete5 c5:package-install my_package_handle
or
$ concrete/bin/concrete5 c5:package-update my_package_handle
When updating, be sure to replace the previously installed package directory rather than adding to it. If not, you could end up accumulating obsolete debris from a previous version of the package. In general you should not uninstall - uninstalling will loose existing data and blocks. Just replace the /packages/_addon_handle_/ directory with the unzipped package update.
If you find yourself often needing to install or update many addons or themes manually, consider my Package Magic addon. Once Package Magic is installed, through the marketplace or manually, all further installs can be handled from the site dashboard using Package Magic. If you build custom code in packages, Package Magic can do a lot more. Package Magic can analyze package structure, zip up packages, upload and download zip files directly to various stores.
Special considerations for manually updating Form Reform
Form Reform implements a lazy block update. This means that when you run the dashboard update, the actual blocks are not immediately updated. The block updates are run in the background.
After updating, you can follow the progress of the lazy update in any of the Form Reform dashboard pages.