File Upload, Webcam and Screenshot
Form Reform provides specialized form controls for file upload and image capture through integration with Snapshot.
The respective form input blocks for the Snapshot tools are:
- Drag & Drop File Input - for general Drag & Drop image and other file upload within a form.
- Screengrab File Input - to capture Screengrab images and upload the images within a form.
- Webcam File Input - to capture Webcam images and upload the images within a form.
How it works

(Not the screengrab of the buttons here, the live demo on the linked page)
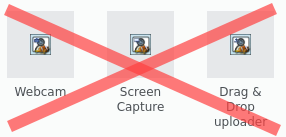
Don't get confused at this point. The Snapshot tool blocks as illustrated above are the direct Snapshot tool buttons and are not the Form Reform input blocks.
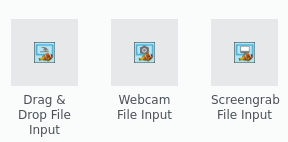
The blocks that integrate with Form Reform are as named ...File Input and appear in the Form Reform group of the block add dialogue as displayed below:
v9 Form input blocks
Not the Snapshot blocks
Quarantine
Each of these input blocks can be added to a Form Reform form as you would any other form input control. They look like form inputs and when used they show thumbnails for the files uploaded. When clicked, these form inputs open the respective snapshot control as an overlay.
The visitor can then upload images and other files including webcam captures and screengrabs, within limitations configured in the block edit dialogue.
The important concept at this stage is that any file uploaded is placed in a quarantine folder without any renaming. Then, when the form is submitted, an Import Quarantine Files form handler copies the quarantined files to the configured destination folder and renames them according to the configured snapshot tool settings.
Debris left in quarantine is automatically cleared, or you can explicitly clear quarantine with the Clear Quarantine Files form handler. For example, perhaps in On Error processing you choose to forcibly clear quarantine.
All of this is specific to a visitor's session.
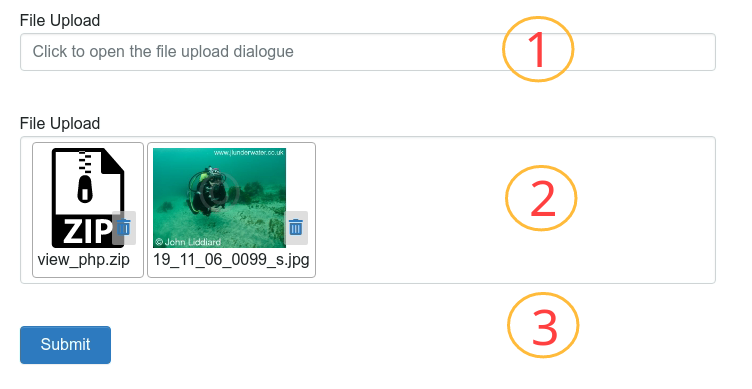
In the screengrab below:
- A Drag & Drop File Input block, as it first appears.
- A Drag & Drop File Input block with two files uploaded to quarantine
- A Form Reform Submit block, where the handler pipeline uses Import Quarantine Files to copy the files from quarantine into their destination folders.
Why Quarantine?
- Quarantine provides an extra level of security for uploaded files.
- Quarantine facilitates multi-step forms, where a file is uploaded in one step, but not imported from quarantine until a subsequent step.
- Quarantine allows a visitor some scope to change their mind. They can click the trash can and upload a replacement before submitting a form.
- Quarantine takes the overhead of uploading files out of the overhead of processing the form handler pipeline. Visitors get a more responsive experience.
- Quarantine provides a state where a file is uploaded and potentially usable before it is copied into its final location. A quarantined file could be sent in an email or used for other form processing and never actually imported.
- Quarantine allows the full functionality of Snapshot to be used to edit images, assign an owner, assign files to folders and filesets.
Block Configuration
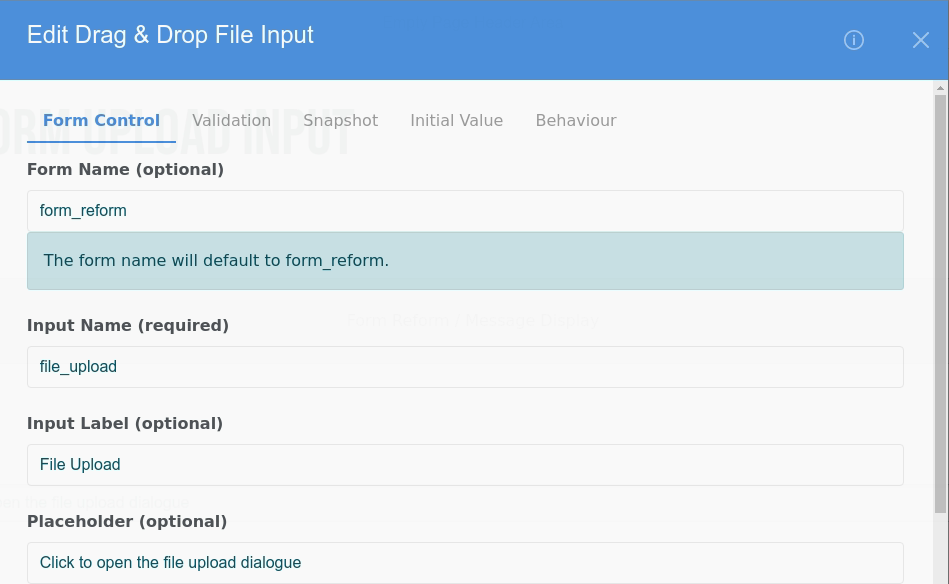
Configuration of these blocks follows the usual Form Reform input tabs
- Form Control - name the form input, add a label and placeholder etc. This is the same as any other Form Reform block.
- Validation - add a required note, set minimum and maximum limits on the number of files required, set a custom fail message. This is the same as any other Form Reform block.
- Snapshot - this tab is the big one. It shows the full configuration options for the respective snapshot tool. Any quantity of files limit set here affects the front end dialogues. This is separate to the limits set for form validation in the preceding tab. In general, they should be configured to agree!
- Initial Value - we don't repopulate file inputs from previously submitted forms, so this tab has a stripped down set of options compared to other Form Reform blocks.
- Behaviour - visibility and rendering in form states. This is the same as any other Form Reform block.
Security Considerations
When adding a file upload to a form you need to consider security and permissions, especially if the form is open to unregistered visitors.
The block configuration dialogues allow image sizes to be constrained, declared file types to be constrained, number of uploads to be limited and various spam checks to be invoked both at the time of the upload (via Snapshot) and through form validation in the handler pipeline.
In Concrete CMS every file needs an owner. A file owner cannot be a guest/visitor. We manage this by assigning an owner to uploaded files in Guests upload as this user. This requires a bit of general configuration. To enable guests/visitors to upload files with their forms, you need to:
- Create one or more user(s) to own the uploaded files.
- Assign file manager permissions to the user(s) so they can Add Files to the final destination folder and so they can Add Files and Delete Files from the quarantine folder.
Remember, this user is only used internally where guests are uploading files. Your guests/visors do not have the permissions of this user. They remain guests. But the Snapshot tools use the special user(s) to allow files to be added and removed from quarantine and added to their final destination folder.
For registered users, they upload as the actual user, not as the Guests upload as this user. This enables sites to manage who can and cannot upload with the full granularity of Concrete CMS permissions. Any registered user will need similar permissions configured to upload files. You can assign permissions to the Registered Users group, or create your own specific groups to manage upload permissions.
In our screengrab below, we have created a user called PublicUpload and assigned permission to add and remove files from the quarantine folder. Similar permission and user(s) will be needed for any site allowing guest/visitor users to upload files with Form Reform.
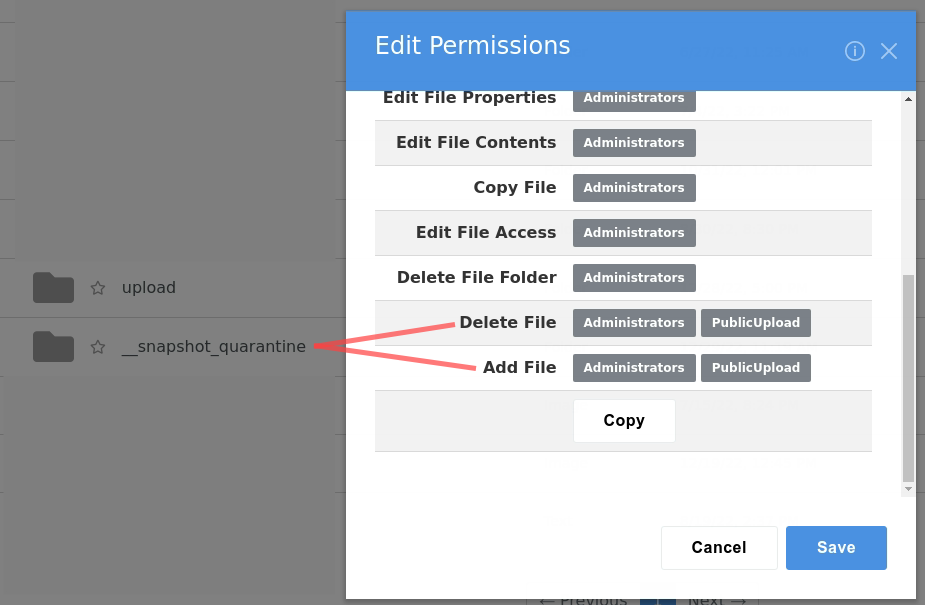
Also in our screenshot is the upload folder where we are placing the files once imported from quarantine, which we have given permission for the PublicUpload user to only add files.
This approach can grow to become more sophisticated where you need to add further structure to the imported files, for example:
- Consider different destination folders for each form on your site.
- Consider different 'upload as' users for each form on your site.
- Consider creating subfolders named after the visitor first name / last name and zip code - taken from form fields.
In general, when visitors can upload files with your Form Reform forms, the block configuration should be the absolute minimum needed to facilitate the upload. Tie everything down so you don't get unwanted surprises.
Using uploaded files
In the form handler pipeline, once a file has been imported with Import Quarantine Files we can use that file through {{place_holders}} in subsequent stages of the form pipeline. These enable use of URLs to the file and the file ID. Please refer to the {{place_holders}} documentation page for details.
An option of the Import Quarantine Files handler is to choose which file property is actually mapped into the input name, and hence saved with any record of the form submission. This facilitates use of different file properties at different steps of the pipeline. For example, you would usually want to save just the file ID with the form record, but use a secure URL when sending an email to the person submitting the form or to any integrated third party destination.
You don't even need to Import Quarantine Files. Files can be used directly from quarantine without completing the import, as long as the use is completed before the quarantine files expire or are explicitly cleared by Clear Quarantine Files. For example, a file uploaded and quarantined could be embedded into an email and then cleared so no copy is retained on the web server.
If you subsequently need to display uploaded files, consider using Omni Gallery to display files based on folders or filesets.