Geocoding and Address Lookup
Form controls and handlers for address lookup and geocoding with Form Reform.
Form Reform provides address lookup and geocoding through a range of overlapping facilities. Here we provide an overview of the facilities provided and how they can be used.
Always consider that hidden geocoding has implications for privacy and GDPR. You may need to notify visitors that you are geocoding in addition to notification of any Google Analytics notification.
- Continent, Country and State select form controls can be pre-populated by geolocating from a visitor's IP address.
- The Address Lookup form input control integrates with the Google places API to help fill an address input. Detailed address data including latitude and longitude is made available to the form processing.
- The Address Geocode form handler can take an address (or partial address) entered through form input controls and use the Google places API to lookup detailed address data including latitude and longitude and make that data available to subsequent handlers in the form processing.
Accuracy and provision of specific fields in the geocoded data depends on what a visitor enters to your form and the data returned by the Google API.
The difference between Address Lookup and Address Geocode is that:
- Address Lookup is performed interactively with the visitor in their browser, then the result submitted to the server with the form.
- Address Geocode is performed with form handling on the server using data already entered from form inputs.
Hence Address Geocode is not interactive. Use one or the other depending on your requirements. In most cases using both on the same form is superfluous.
Continent, Country and State form controls
Continent, Country and State select form controls can be pre-populated by geocoding from a visitor's IP address.
This is the simplest form of geocoding and uses an IP lookup to locate a visitor from an IP location database.
The lookup does its best to work through any proxy servers, but cannot be guaranteed accurate. Hence the usual use for this kind of geocoding is to pre-populate a Continent, Country or State select form control with the location derived from the visitor's IP address and then allow the visitor to make the actual selection.
These form inputs can be used in association with other inputs to allow a visitor to enter discrete address fields, then in the form handling to build an address from those inputs. However, such discrete inputs are usually superfluous if you are using the Address Lookup form input.
Within the form handling, an address built from the discrete inputs can also be used with the Address Geocode form handler to add further address components and provide a latitude / longitude for the address.
Geolocation Services
Geolocation services can be configured with the configuration key jtf_resources.alt_geo_lookup_urls. Each entry should be the service API URL for JSON lookup. The format character %s is used to insert the IP address to geolocate.
For example:
'alt_geo_lookup_urls' => [
    'https://free.freeipapi.com/api/json/%s',
    'https://ipapi.co/%s/json/',
    'https://ipwho.is/%s',
    'http://ip-api.com/json/%s',
]
IP Lookup Services
IP addresses will normally be extracted from request headers. However, when developing forms on a localhost the IP address provided in a header will be a localhost address. Form Reform's geolocation detects this and uses an IP lookup service to return the IP of the server's internet connection. These services can be configured at jtf_resources.ip_lookup_urls. No parameters are required.
'ip_lookup_urls' => [
    'https://api64.ipify.org',
    'https://api.ipquery.io/',
    'https://geoip.fortnic.com/ip',
]
Address Lookup form control
The Address Lookup form input control integrates with the Google places API to help fill an address input. Detailed address data including latitude and longitude is made available to the form processing handler pipeline. To use this form control you will need a Google Maps API key with the Google places API enabled.
The Address Lookup form input control will usually be used by itself. It is a complete address input with no need for further address related input controls to input a visitors address.
The visitor begins typing and address options are presented as they type. The visitor then selects their address from the presented options. The selected address, together with detailed data including latitude and longitude, is then available in the form handler pipeline.
If you use an Address Lookup form control, the Address Geocode handler is superfluous. The geocoded data is provided with the form data, so you don't need to look it up again in the form handler pipeline.
Detailed data from the address lookup is returned in a hidden field as JSON. This data is available to the processing pipeline as {{place.holders}} using dot.notation to index into the data. See the Lookup tab of the block edit dialogue.
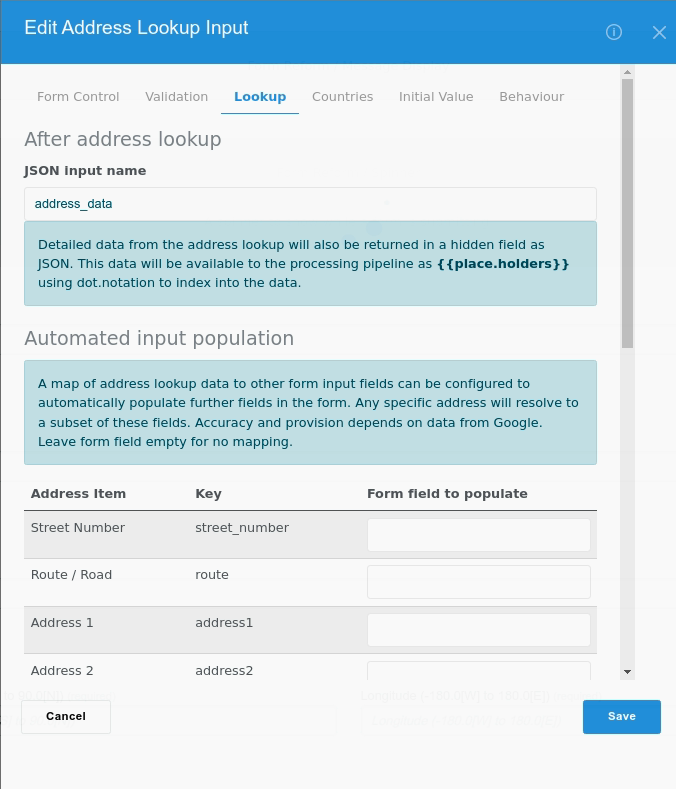
Automated Input Population
A map of address lookup data to other form input fields can be configured to automatically populate further fields in the form. This is unlikely to be of use in single step forms, but may be of use in multiple step forms where an initial step makes an address lookup then subsequent steps allow the visitor to refine or modify the information from the geocoded address.
Countries
Address lookup can be open to all countries in Google's places data or restricted to a list of up to 5 countries. This can help narrow the results more quickly for your visitors.
Example
In our example below, we have an Address Lookup form input control.

Behind the scenes, we have configured this to provide the geocoded address as JSON in address_data. Our submitted form data now looks like
{
    "address_lookup": "1600 Pennsylvania Avenue Northwest, Washington, DC 20500, USA",
    "address_data": {
        "formatted": "1600 Pennsylvania Avenue NW, Washington, DC 20500, USA",
        "latitude": 38.8975342,
        "longitude": -77.0365041,
        "postal_code": "20500",
        "cc": "US",
        "country": "United States",
        "sc": "DC",
        "state": "Washington, DC",
        "town": "Washington",
        "neighborhood": "Northwest Washington",
        "route": "Pennsylvania Avenue Northwest",
        "address1": "1600 Pennsylvania Avenue NW",
        "street_number": "1600"
    }
}
This is submitted form data, so we can use it directly without further geocoding in subsequent handlers with dot notation as {{form:address_data.latitude}}, or abbreviated as {{address_data.latitude}}.
If we save the form to a store, the entire JSON will be saved (unless we redact specific items).
Address Geocode form handler
The Address Geocode form handler can take an address (or partial address) entered through form input controls and uses the Google places API to lookup detailed address data including latitude and longitude. The geocode data is then available to subsequent handlers in the form processing. To use this form control you will need a Google Maps API key with the Google places API also enabled.
The difference between Address Lookup and Address Geocode:
- Address Lookup is performed interactively with the visitor in their browser, then the result submitted to the server with the form.
- Address Geocode is performed with form handling on the server using data already entered from form inputs. Hence Address Geocode is not interactive.
Use one or the other depending on your requirements. In most cases using both on the same form is superfluous.
On the form, regular form controls such as Text inputs and Country select are used to gather address components from the visitor, then in the form handler pipeline an address is assembled and submitted to the Google API.
In our screenshot below, we have a form built with regular form controls.

When submitted, our form handler pipeline includes an Address Geocode handler to geocode data for an address assembled from those inputs.
{{address1|}} {{city|}} {{zip|}} {{country}}
Note the use of the pipe "|" to instruct 'or nothing' for each input. This facilitates entering a partial address, such as a street address and Zip code without the city. Beware that providing less data can lead to inaccurate geocoding.
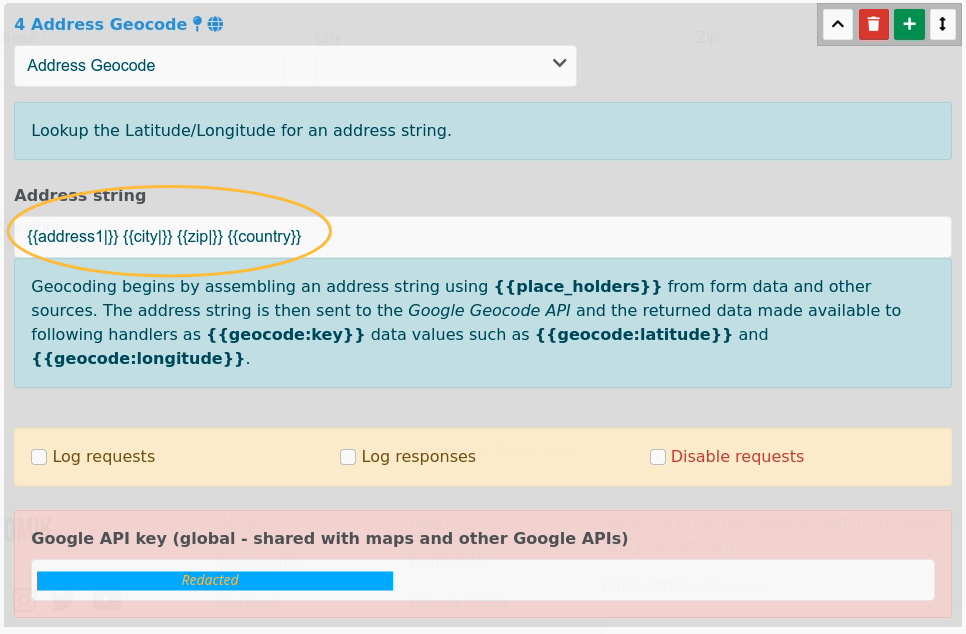
The results of an Address geocode are not form inputs. The data is made available to subsequent processing through the category geocode, not with the default form category.
In our example, the geocode category is filled with data:
{
    "lookup_address": "1600 Pennsylvania Avenue  Washington DC 20500 US",
    "place_count": 1,
    "formatted": "1600 Pennsylvania Avenue NW, Washington, DC 20500, USA",
    "latitude": 38.8976633,
    "longitude": -77.0365739,
    "place_id": "ChIJGVtI4by3t4kRr51d_Qm_x58",
    "postal_code": "20500",
    "cc": "US",
    "country": "United States",
    "sc": "DC",
    "state": "Washington, DC",
    "town": "Washington",
    "neighborhood": "Northwest Washington",
    "route": "Pennsylvania Avenue Northwest",
    "address1": "1600 Pennsylvania Avenue NW",
    "street_number": "1600"
}
This can be accessed using placeholders such as {{geocode:latitude}} in subsequent handlers.
Saving geocode data with the form
Form save handlers only save form data. Hence data you would access through {{geocode:item_key}} will not be automatically saved with a form.
To save this derived data, use the Extend Form Data handler to add further name => value pairs to the form data. This obviously needs to be in the handler pipeline before the Save to Default or other form data save handler.
Which to use?
If you only need to locate a visitor to a country, use the IP lookup geocode of the Country input. It is faster and uses an open database, so there is no cost involved.
When you use the Google API, you get a reasonable free monthly allowance, but are subsequently chaged a small amount for each request. Its a small amount, but on a busy site it can soon accumulate.
It is rare that an application will need both Address Lookup and Address Geocode on the same form. Implementing both on the same form is superfluous and will add to your billing for Google API use.
Address Lookup is performed interactively with the visitor in their browser, then the result submitted to the server with the form. Because it is interactive, it will be less likely to contain mistakes. Your visitor will select a correct address. Because it is interactive, it will also make more requests to the Google API and once you pass the free usage threshold, will accumulate a greater bill.
Address Geocode is performed with form handling on the server using data already entered to form inputs. A Google API call is made once when the form pipeline is processed. This is further optimized by caching. Thus it will in most cases result in lower billing. The disadvantage is a potentially higher risk of mistakes. If the data a user enters could resolve to more than one place, they don't get a chance to correct that. The form handler simply uses the first place listed.
Related form input controls
Latitude and Longitude
Form Reform also provides a Latitude/Longitude form input control. This input is not geocoded. It allows a user to input a latitude or longitude directly.
If using the Address Lookup input, the address lookup can be configured to populate latitude and longitude inputs from the geocoded data.
Geofencing
The Geofence Continent and Geofence Country blocks can be used to fence forms to a region based on IP lookup. Both blocks can optionally
- Redirect a geofenced visitor rather than let them see the form page.
- Fail validation of a form submitted by a fenced visitor.