Example - Multi Step Forms

Here we have the same form blocks and pipeline as in Getting Started - Your First Form and in Tabbed Forms, The only difference is that our form is split it into two distinct steps.

There are many ways to implement multi step forms. In this example, for the first step we render just the input blocks for that step. Then in each subsequent step the previously shown input blocks are persisted (Initial Value) and hidden (Behaviour) and the new input blocks for that step are shown. The Submit button block for each step is only rendered in that step.

Our inputs for the second step (and any subsequent steps) are not rendered in step 1 (or any previous steps)

Over multiple steps, the hidden part of the form grows behind the scenes. The validity of all previously submitted steps is checked with each step. In effect, the accumulated hidden input blocks are used as browser-side storage until our final step is submitted.

Try the form below. Feel free to submit the form as often as you want. The form is saved to your session, but the data is not saved or logged anywhere else. All it does is validate the inputs and return a success or error message. The session data facilitates persistence of some inputs, so you only need to enter your name and email once. You can also see your most recent form submission presented using Form Reform Display.

Submit

We now have two submit blocks. One called 'Next' with value 'next' for Step 1 and one called 'Submit' with value 'submit' for Step 2.

Submit processing for both is handled by variations of the pipeline used in Getting Started - Your First Form.

Step 1

In step 1, we have changed some of the messaging and added a Next Form State handler to the end of both the error handling and the success handling.

At the end of the error handling, the state is set to Error and Step 1, because we want to stay in Step 1 and not progress.

At the end of the success handling, the state is set to Information and Step 2, because we want to progress to Step 2 and we are showing an information message about completing Step 1.

Step 2

Once in Step 2, we have changed some of the messaging. We don't need to specify further steps because the message status does that for us. We have either Error or Success.

At the end of the error handling, the state is set to Error and Step 2, because we want to stay in Step 2 and not revert to Step 1 or show controls for both steps.

Pipeline notes

The pipelines shown below are front-end non-editable versions of the pipelines used to handle the above form. You can expand any stages to view the details. The submitted form is only saved to your session.

The common processing of Validation and Spam Detection has been moved into a macro.

The Condition If section towards the end each pipeline is to add a display of any UTM tags, as described in Example - Tracking UTM tags. If you are not using Form Reform UTM, you can ignore that part of thes pipelines.

Handler pipeline for: Next


Handlers in the pipeline will be applied in sequence when a form is submitted.

Macro

Call a macro. Macros are like subroutines of form handlers. Macros are managed at Dashboard > System & Settings > Form Reform > Form Reform Macros . Use macros to organise and structure long pipelines and to factor out common pipeline sequences.
Name/key Value
{{macro:key}} parameters declared by a macro handler exist only for the duration of the inserted macro handler pipeline and override any previous {{macro:key}} values of the same key. Values are filled with the raw data and can be used in handlers that work with data structure. On completion of the macro pipeline, any previous {{macro:key}} values are restored.

On Success

Denotes success processing (no errors). On Error and On Success should always be used in together to denote processing for errors and processing for no errors. Either may be used first.

Save to Session

Save form submission to session data. Data extracted from form fields is saved to the visitor/user session data. This is transient data that lasts for the duration of the Concrete CMS session. The primary reason for saving to a session is to enable values to be recovered and inserted into the same or other forms.
A form can be saved to the name configured by the form blocks or to a different (alias) name. This can be convenient when you take advantage of the default name "form_reform" when adding a single form to a page, but would like a more specific name for the saved form data.
A form submission may optionally update an existing response by matching one or more criteria of the response.
When a user is completing multiple forms, to keep the data from growing, old submissions may be cleared.
Name
Form items may optionally be redacted from the data that is saved. For example, to remove a password from the saved data. Redacted items are listed by input_name.
Where suggestions are offered, these are only suggestions. Other input names/handles may exist in the form and may be entered.

Message

Create a form response message to be displayed to the user. Build boilerplate for a response message, fill the boilerplate with form and site parameters and select a level to emphasize the message display. All text fields can use {{place_holders}} to be filled with system or entered form values.
The level of a message will also affect the Hide/Do-not-render state of subsequent form controls
   

Next Form State

Designate the next form state. A form control can be hidden, disabled or not rendered for various form states, for example, when a success message is shown or during one or more parts of a multi-step form. All forms begin in Step 1. The next state(s) can also be set automatically by a Message. States are accumulated through the executed handler pipeline steps.
Next State(s)

On Error

Denotes error processing. On Error and On Success should always be used in together to denote processing for errors and processing for no errors. Either may be used first.

Next Form State

Designate the next form state. A form control can be hidden, disabled or not rendered for various form states, for example, when a success message is shown or during one or more parts of a multi-step form. All forms begin in Step 1. The next state(s) can also be set automatically by a Message. States are accumulated through the executed handler pipeline steps.
Next State(s)

Message

Create a form response message to be displayed to the user. Build boilerplate for a response message, fill the boilerplate with form and site parameters and select a level to emphasize the message display. All text fields can use {{place_holders}} to be filled with system or entered form values.
The level of a message will also affect the Hide/Do-not-render state of subsequent form controls
   

Handler pipeline for: Submit
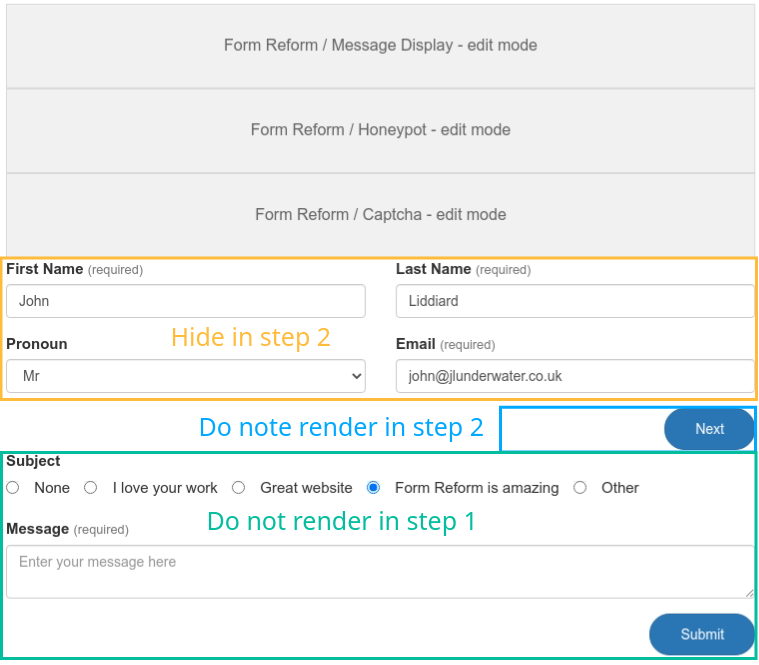

Handlers in the pipeline will be applied in sequence when a form is submitted.

Macro

Call a macro. Macros are like subroutines of form handlers. Macros are managed at Dashboard > System & Settings > Form Reform > Form Reform Macros . Use macros to organise and structure long pipelines and to factor out common pipeline sequences.
Name/key Value
{{macro:key}} parameters declared by a macro handler exist only for the duration of the inserted macro handler pipeline and override any previous {{macro:key}} values of the same key. Values are filled with the raw data and can be used in handlers that work with data structure. On completion of the macro pipeline, any previous {{macro:key}} values are restored.

On Success

Denotes success processing (no errors). On Error and On Success should always be used in together to denote processing for errors and processing for no errors. Either may be used first.

Save to Session

Save form submission to session data. Data extracted from form fields is saved to the visitor/user session data. This is transient data that lasts for the duration of the Concrete CMS session. The primary reason for saving to a session is to enable values to be recovered and inserted into the same or other forms.
A form can be saved to the name configured by the form blocks or to a different (alias) name. This can be convenient when you take advantage of the default name "form_reform" when adding a single form to a page, but would like a more specific name for the saved form data.
A form submission may optionally update an existing response by matching one or more criteria of the response.
When a user is completing multiple forms, to keep the data from growing, old submissions may be cleared.
Name
Form items may optionally be redacted from the data that is saved. For example, to remove a password from the saved data. Redacted items are listed by input_name.
Where suggestions are offered, these are only suggestions. Other input names/handles may exist in the form and may be entered.

Message

Create a form response message to be displayed to the user. Build boilerplate for a response message, fill the boilerplate with form and site parameters and select a level to emphasize the message display. All text fields can use {{place_holders}} to be filled with system or entered form values.
The level of a message will also affect the Hide/Do-not-render state of subsequent form controls
   

Comment

Insert a comment. Make a comment or note within the pipeline. This handler has no effect on pipeline processing.
The condition below is purely for demonstrating UTM tags. If you don't use UTM, you can ignore this condition.

Condition If

Check a condition and either proceed or move forwards to an alternative. The handlers ConditionIf, ConditionElseIf, ConditionElse and ConditionEnd manage a single level of conditional processing in form handling.


Message

Create a form response message to be displayed to the user. Build boilerplate for a response message, fill the boilerplate with form and site parameters and select a level to emphasize the message display. All text fields can use {{place_holders}} to be filled with system or entered form values.
The level of a message will also affect the Hide/Do-not-render state of subsequent form controls
   

Condition End

Denotes end of condition processing. The handlers ConditionIf, ConditionElseIf, ConditionElse and ConditionEnd manage a single level of conditional processing in form handling.

On Error

Denotes error processing. On Error and On Success should always be used in together to denote processing for errors and processing for no errors. Either may be used first.

Message

Create a form response message to be displayed to the user. Build boilerplate for a response message, fill the boilerplate with form and site parameters and select a level to emphasize the message display. All text fields can use {{place_holders}} to be filled with system or entered form values.
The level of a message will also affect the Hide/Do-not-render state of subsequent form controls
   

Next Form State

Designate the next form state. A form control can be hidden, disabled or not rendered for various form states, for example, when a success message is shown or during one or more parts of a multi-step form. All forms begin in Step 1. The next state(s) can also be set automatically by a Message. States are accumulated through the executed handler pipeline steps.
Next State(s)

In Edit Mode

In edit mode, the blocks for the form look something like the screengrab below. We have the same Form Reform blocks as in Getting Started - Your first form with the addition of an extra submit block for 'Next'. The Message, Honeypot and Captcha blocks at the top of the form and common to both form steps. We then split the form into two steps using a combination of Do not render and Hide when configured in the Behaviour tab of each individual block edit dialogue.

In general, all step 2 blocks are not rendered in step 1.

The step 1 submit 'Next' block is not rendered in step 2. We don't need its pipline once step 1 is completed.

Then all step 1 blocks are hidden in step 2 as a convenient way of preserving their data. That isn't essential, because Form Reforn can incrementally update a submitted form record, its just convenient here.

More than 2 steps

When installed, Form Reform is configured with 5 arbitrary form steps in addition to the message states. These form steps do not need to be used in sequence, other than a form always begins in Step 1.

If you need more steps, the number can be configured in application/config/ at jl_form_reform.visibility_states.max_form_steps.

Saving data

In this example, we maintained step 1 data by persisting the inputs and keeping them hidden through step 2. The form submission is then saved with all data at the end. 

Form Reform blocks used

Source Page / Stack Form Name Block Type Input Name
Example - Multi Step Forms form_reform Text Input first_name
Example - Multi Step Forms form_reform Select Input pronoun
Example - Multi Step Forms form_reform Email Input email
Example - Multi Step Forms form_reform Message Display
Example - Multi Step Forms form_reform Honeypot more
Example - Multi Step Forms form_reform Captcha
Example - Multi Step Forms form_reform Submit Button next
Example - Multi Step Forms form_reform Radioset Input subject
Example - Multi Step Forms form_reform Text Area Input message
Example - Multi Step Forms form_reform Submit Button submit
Example - Multi Step Forms form_reform Text Input last_name
Developer Analysis

Additional Pages

Reform the way you add new input controls

If you need a specialized template or a custom input element, you can design new templates  or new block types for form elements as you would any block type.

Blocks are easy for third party addition or extension. Block templates and are the first thing any Concrete CMS developer learns to code. They are one of the easiest things to code. The underlying mechanisms are well established and reliable.

Reform what you can do with form data

Form handlers are built about the same extensible plugin system as many of my other addons (Universal Content Puller, Omni Gallery, Extreme Clean ...).

The whole system is aimed at easy extension within Form Reform, by third party addons, by agencies and by site building developers.

Handlers can be easily added to do whatever you want with the form data.

Reform where you can save form data

Saving form data with Form Reform is simply a handler in the processing pipeline. You can save to multiple locations or just one location.

If you need to save data elsewhere, such as to a dedicated table, a table provided through another addon, to another database, send it to an API, forward it to another server, or anywhere you can imagine, you can adapt or develop a form handler to do so.

The complexity of the code depends on where you are saving or sending the data, but wrapping that into a form handler plugin for Form Reform is straight forward.

The Form Reform handler plugin system is designed for easy extension.

Form Reform

Reform the way forms are built. Build a form out of blocks. Take control of how form submissions are processed and how the submitted data is stored. Easy to extend. Easy to reconfigure. Tangible data. Easy to add your own integrations.

Form Reform Display

List and display form submissions from Form Reform.

Form Reform UTM

Not just Form Reform and not just UTM! Capture and hold incoming UTM (or other) tags and make the tag values available to Form Reform and/or Conditional Redirect as {{place_holders}}. You don't need Form Reform to use this.

Form Reform Dynamics

Form handlers for querying Microsoft Dynamics, forwarding and updating form data to Microsoft Dynamics.

Snapshot

A suite of advanced image capture and upload tools. Enhanced drag and drop file uploading. Make screengrabs from within Concrete CMS. Capture images directly from device webcams. Edit images before uploading.

Form Reform Attributes, Express and Users

Save submitted forms to Express objects and user attributes. Add and remove users from groups.

Form Reform Image Picker

Form Reform Image Picker provides an image picking input block for Form Reform. The Image Picker Input is preconfigured to connect to most Omni Gallery gallery and slider display widgets, the core gallery block, and thumbnail showing templates for the core page list block. Advanced settings allow the Image Picker Input to be configured to pick images from other galleries and sliders.

Form Reform Data Picker

Form Reform Data Picker provides data picking input blocks for Form Reform. The Table Picker Input is preconfigured to connect to Universal Content Puller table display widgets. Advanced settings allow the Table Picker Input to be configured to pick data from other HTML tables.

Form Reform Macros

Extends Form Reform with form handler macros. Provides a new dashboard page at System & Settings > Form Reform > Form Reform Macros to manage macros, and form handlers to run macros.

Form Reform Developer

A growing suite of resources to assist those developing blocks, handlers and more complex forms for Form Reform.

Learn with a simple form

While you may have plans to implement some much more complex forms using Form Reform, we strongly recommend you start with a simple form such as our contact form example in order to review the basic principles of using Form Reform before you move onto anything bigger.

  1. Start by submitting the form at Getting Started - Your First Form a few times, even making some deliberate mistakes.
  2. Watch our Getting Started with Form Reform video to see how the form is built.
  3. Read through the rest of Getting Started - Your First Form for more details of how this form is built.
  4. Create a test page on your site to build your own version of Getting Started - Your First Form and experiment.
  5. Develop your test page with some of the concepts introduced by our further examples and experiment with some of the other form inputs.